Abstract
some abstract here
Introduction
engaging students difficult
gamification, escape rooms
solution in education? efforts?
challenges: cost, setup time, adaptability
here we outline ...
use it yourselves, or let your students build one based on this idea: resulting in an entertaining experience and a learning experience in electronics and programming
Background
some info on the educational escape rooms
https://
The design
Outline of the escape room
The idea of this educational escape room is to have students work together in small teams to solve a series of puzzles within a limited time frame (typically 45-60 minutes). For the puzzles of the physics escape room we were inspired by the ranking tasks by O'Kuma et al. (2003). In these puzzles students rank variations of a physical situation on the basis of a (specified) physical quantity. To make it a true escape room puzzle, the students need to figure out first what the quantity is that needs to be ranked. In most of these tasks, only four variations are given, hence we decided to use four numbered buttons for input. To decrease the chance of random guessing, we included a time penalty for wrong answers - including a buzzer and red led as feedback. When the students solve a puzzle correctly, a green led lights up, indicating their progress: each escape room consists of four levels/challenges. In the first escape room we designed, the students required the teacher’s help to solve some of the puzzle. To minimize the teacher’s involvement, we added a hint system to the escape room: by pressing a hint button, a hint is displayed on the LCD screen.
Game elements
Although these activities can be entertaining as it introduces a game element to the learning environment, presented these just as activities may diminish the escape room as doing physics homework. Hence, we normally frame the escape room in a specific context, e.g., students in their final year have stolen the next week’s test and want to trade these for their exams. You are standing for the vault door and need to solve the puzzles to open the vault. You only have 40 minutes before the head of the school returns from his teaching duties!
When playing a game, their needs to be some prize for escaping the room. This can be anything from candy to extra points on the next test, to seeing the next week’s test for one minute. The latter was done in one of our escape room: the students who escaped had already shown their abilities to pass the test, but were also so excited that they forgot all questions in the test that was presented to them.
Materials and setup
The entire setup is designed to be affordable and easy to assemble using commonly available components. We used a tea box with dimensions of approximately 20 x 15 x 10 cm as the enclosure for the electronics. However, any box of similar size can be used - it might be worthwhile to visit the local second-hand store to find a suitable box. We disassembled the lid of the box and used a laser cutter to create holes for the buttons, leds, buzzer, and LCD screen (the source file is included in the supplementary files), see figure 1.
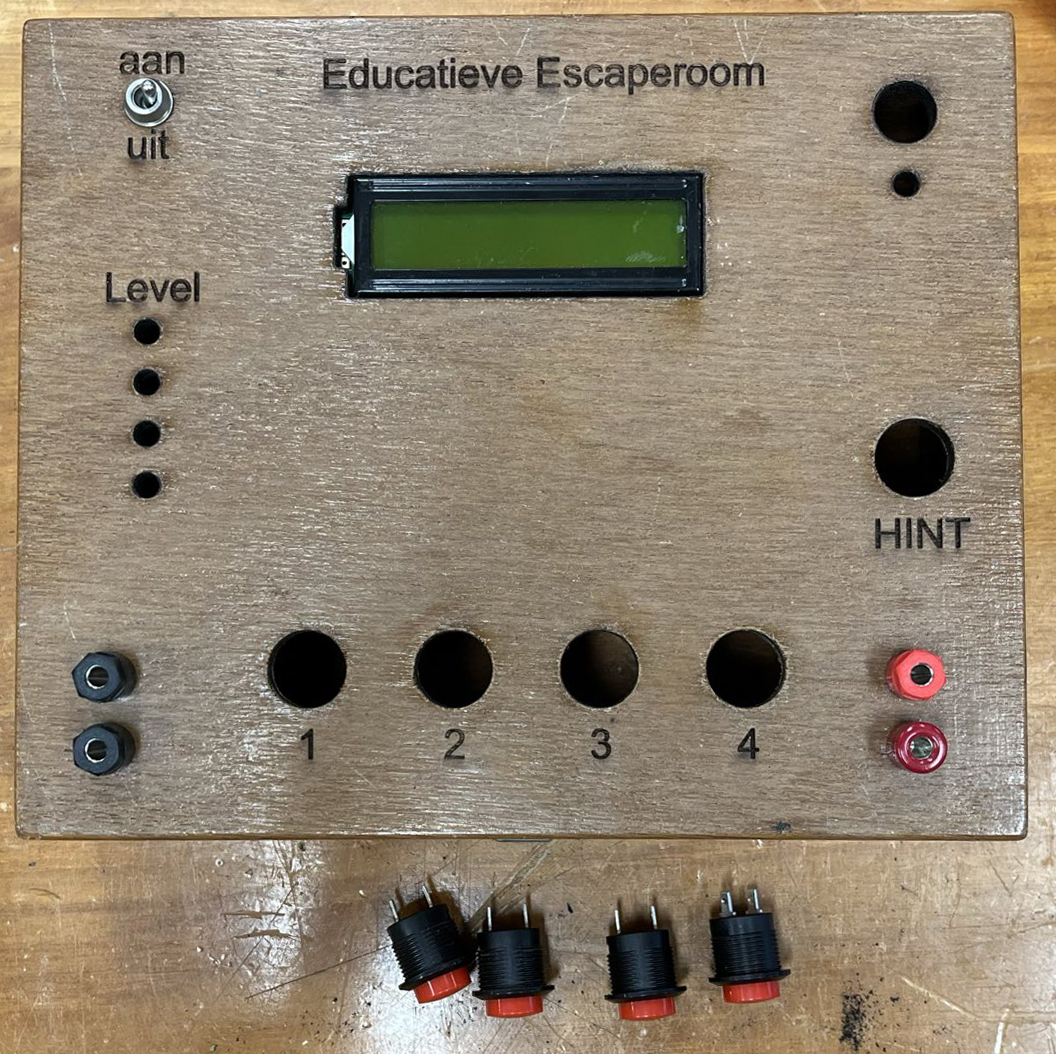
(a)Top view of the tea box with holes for buttons, leds, buzzer, and LCD screen.
(b)The schematic for the top of the box used for the laser cutter.
For this project, we used the Arduino Uno R3 as the main microcontroller. It is both affordable, widely available and has enough input and output pins to connect all the necessary components.
We included four 16 mm panel mount push buttons for user input. Using a series circuit with resistors, where each button is connected to a different resistor value, we can read the button presses using a single analog input pin on the Arduino, see figure 2. This reduces the number of required pins and simplifies the wiring. Moreover, this system allows to easily add more buttons if needed.

Figure 2:Wiring diagram of the button input circuit using resistors. circuit
Four green leds are required to indicate the progress of the team (though more leds can be added, optionally using a multiplexer to reduce the number of required pins). A red led is used to indicate a wrong code entry, or running out of time. A buzzer is used to sound an alarm or, when complete, a victory tune.
In this project we used the internal clock of the Arduino to keep track of time. Optionally, a real time clock (RTC) module can be added to keep more accurate time, especially when the device is powered off and on again.
An LCD screen is used to display the timer, hints, and other information to the players. We opted for the LCD with integrated I2C module, which reduces the number of required pins to just two (SDA and SCL), and off course power and ground.
Finally, a battery pack and on/off switch are used to power the entire setup, making it portable and easy to set up anywhere.
Code
Implementation
puzzles
ranking task
Conclusion
- O’Kuma, T. L., Maloney, D. P., & Hieggelke, C. J. (2003). Ranking Task Exercises in Physics: Student Edition. Pearson.